A Golden Reef Tank

halmus

Registered Users
M.A.S.C Club Member
ex-officio
#81
lee_is_007;635445 said:
Man... talk about doing things the right way the first time lol. Looking good!!!
I am trying very hard to do things right with this build. It's not my first time, but the first tank in years and a culmination of a lot of time day dreaming. Thanks.

Sctip;635456 said:
Looks awesome.

+1 to you hosting a meeting.....
I'll be more than happy to host a meeting. I am putting in a dry bar in the alcove, a counter around the tank, and will have plenty to look at under the hood. It will be fun. Maybe the pool table will even be in place by then (far enough away from the tank, of course).

highaltitude;636010 said:
that 4' cube has always been my dream tank ! imagine the aquascaping possibilities !
highaltitude;636011 said:
took me over a year to finish my basement of 1100 square ft, i will never be the same after that project :/ Looks amazing !
I could alway imagine bigger, but this tank should have plenty of room to work in. I just hope it isn't too painful being this deep. I've never been the type to care about getting my hands dirty or wet.

I'll just place a hook inside the back room to permanently hang my triathlon wetsuit and goggles for easy access during tank maintenance. I won't have time for a race any time soon.

Thanks for following. I am one day closer to the basement being done and the tank being functional.
 
#82
i got a deal on a 120 tall , 30 " tall and i wish i would have walked away ! I love the tank , but when my armpits get wet every time i want to adjust something , i mean come on ! haha i might need to join the wet suit club !
 

halmus

Registered Users
M.A.S.C Club Member
ex-officio
#83
I don't know if the picture will go through here but....

I started working on a few cabinets in the filtration room yesterday. It was my birthday, so my gift to myself was working on the aquarium room instead of higher priority things.


That's the toe kick for the cabinet. I'm leaving it as an elevated platform instead of a solid toe kick so that moisture can't get trapped under there long term.
 
Last edited by a moderator:

halmus

Registered Users
M.A.S.C Club Member
ex-officio
#84
I am making custom laminate tops for everything in this room. I ordered the raw Formica sheets online. The two window sills will have laminate tops as well. My wife is using part of the room for gardening and this will make a nice place to set starters and not worry about water damage.

I'll also probably grow out plankton again. These two windows get a lot of natural light, so I can take advantage of that.

 
Last edited by a moderator:

halmus

Registered Users
M.A.S.C Club Member
ex-officio
#85
This is the cabinet I'm working on. It's all paint grade and made from scrap material. So, there's a big mix of materials in there. I put some bondo on it yesterday to fill nail/screw holes before calling it a day. I will put a couple coats of paint on it this week and install it soon. Then, I can finish and clean up the baseboard in the room.


The various compartments and drawers will make more sense once I have the counter tops installed and show what everything will be used for.
 
Last edited by a moderator:

halmus

Registered Users
M.A.S.C Club Member
ex-officio
#87
Thanks Cris.

I have a long weekend off work coming up. We'll see what progress I make. I have to focus on the rest of the basement trim work again, but I think I can fit in a few aquarium room hours when the wife's not looking.
 

halmus

Registered Users
M.A.S.C Club Member
ex-officio
#90
The cabinet is installed. I just have some scrap wood on top for a counter top for now. I'll make the top later once I have all of the equipment on hand to measure and build around. The drawers are built and installed. I just need to finish the drawer fronts and doors some time.

I also installed two more lights. I know I was complaining about too much light in the room, but I wanted light directly above the sink and the area will dim down once equipment and racks are in place.


I finished the two windows. That took more work and time than I had expected but I'm happy with how they turned out.


You can also see a spare sump I rescued a few years ago. I don't know if I'll end up using it in this build. It depends on whether I can clean it up or not. Acrylic is easy to work with and it was originally a tank with thick walls. So, the plan would be to cut it down, adapt it for my purposes, and buff out all of the junk. Obviously, I'm putting a lot of effort into this build, so if it looks like junk once I start working on it, I'm not going to use it.


I picked up two tanks today from Tank Equipment up in Fredrick. They're great people to work with and these were in stock. They're 165g (16" man door, 2" bulkhead, 31" dia x 56" tall). They're a little bigger in diameter than I had wanted, but I wanted a large opening in the top in case I need to access the interior. Being so large in diameter means they can be shorter, so that makes them easier to dump salt in when the time comes.


halmus

Registered Users
M.A.S.C Club Member
ex-officio
#91
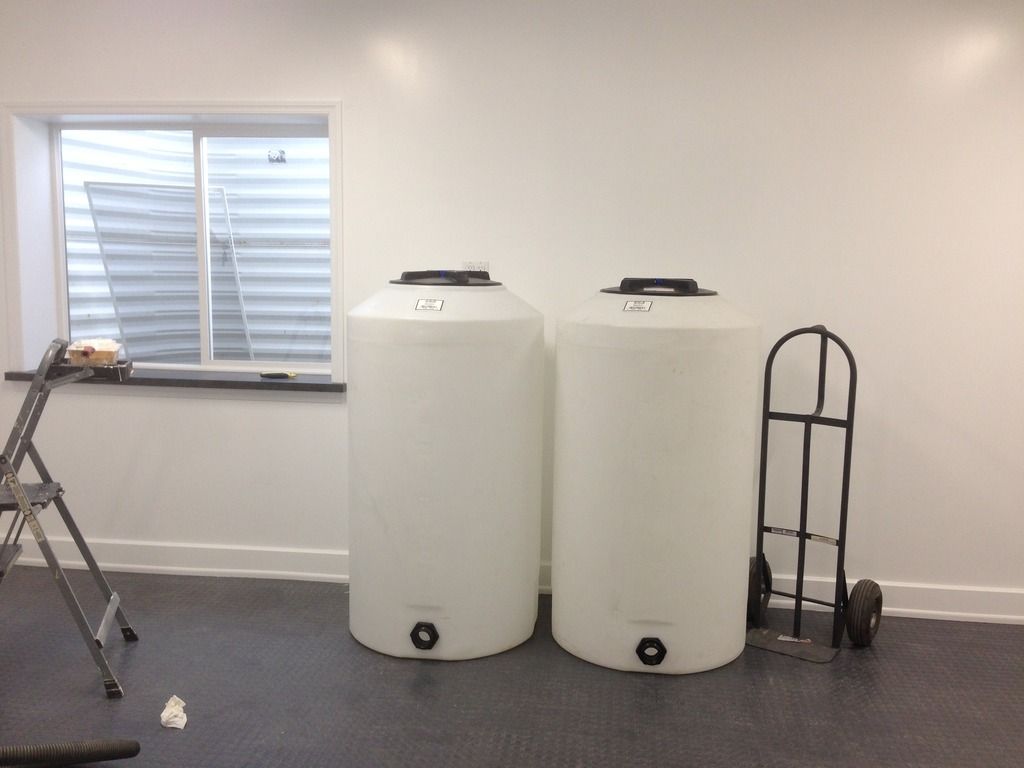
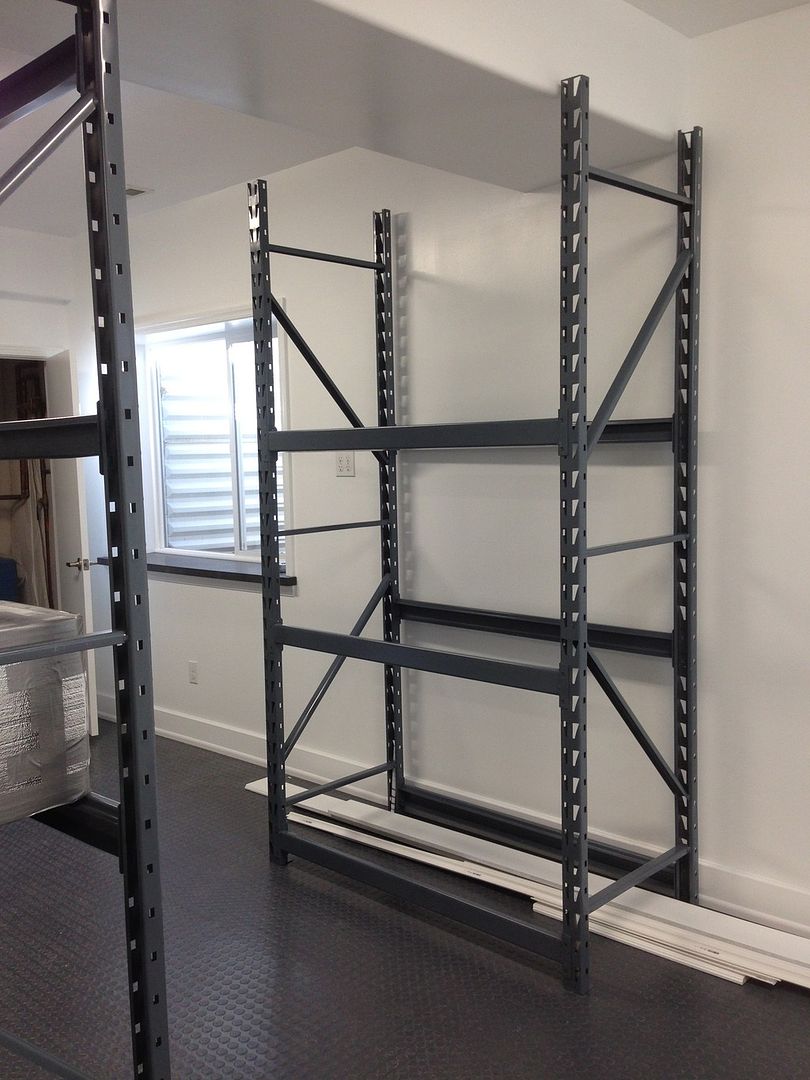
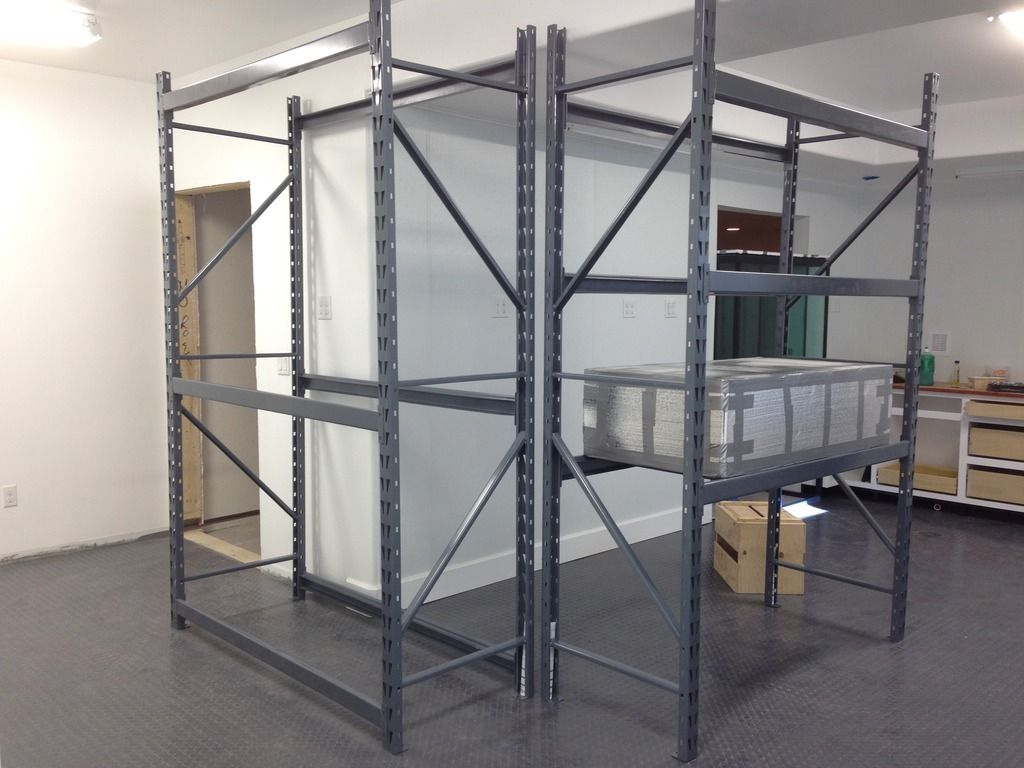
Again, not a big or exciting update. But, I picked up three racks from Grainger today. These will be for refugium, frag tanks, and QT tanks. The QT tanks will be separated between coral and fish QT. The rack on the far wall will be for QT. Since it's a completely isolated system, I can fit it in easily on the far wall.

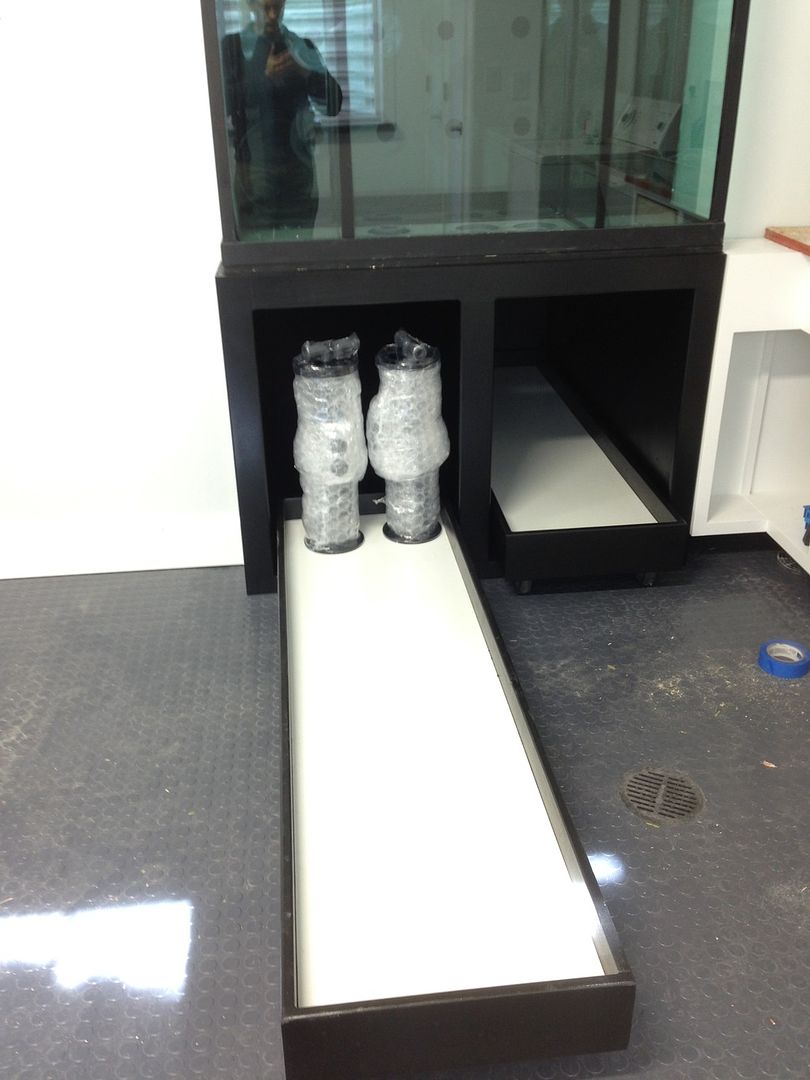
The tank that's wrapped in insulation is one of the frag tanks. I've had it since I moved from Washington and has been wrapped up for over 2 years. I wanted to protect it during the storage -> shipping -> storage -> finally being used periods. I probably should unwrap it, but I'm still months away from being wet. That tank is 48" x 24" x 12". There's a matching frag tank that will go on the level above that's 9" deep. All shelf heights are entirely temporary until I actually start piecing things together and plumbing everything. Of course, there will be appropriate shelves built in the future. I didn't want to pay Grainger for their shelves because they didn't have anything that would really work for this application. I just bought the "naked" rack system for now.

Even the rack placement is temporary. This is my current scheme. It will make more sense once all of the components are in the room. That's my primary goal right now while I'm working on the rest of basement (and house) keeping the Ms's happy. I'm collecting the high dollar items when the funds become available.


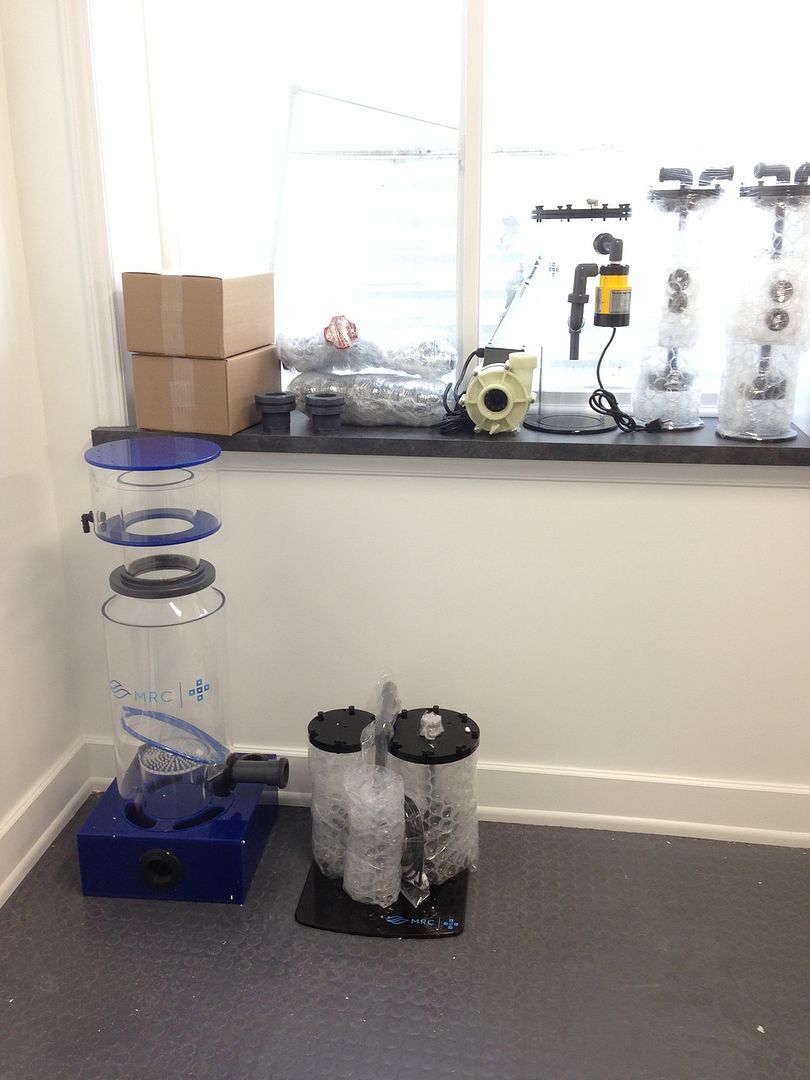
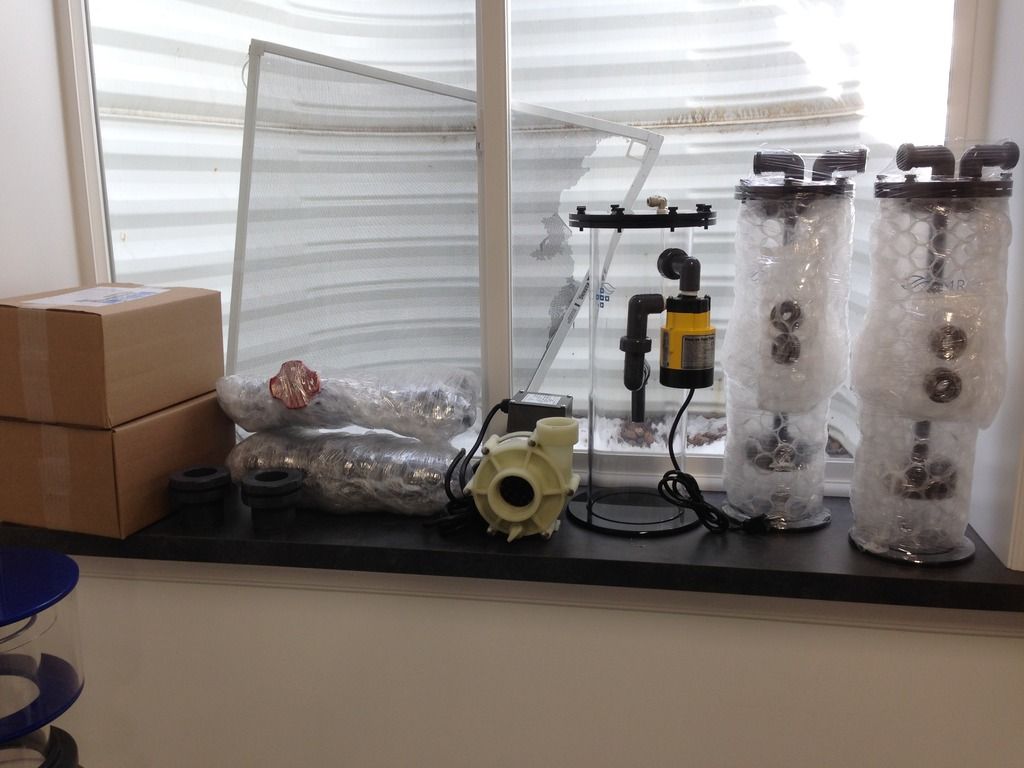
Speaking of collecting equipment for the tank, I am working with Aquatic Art right now on the back end. I am getting a skimmer, calc reactor, Nielson reactor (kalc), and media reactors priced out. I'm looking at MRC for those items. I have multiple tubs of heaters, pumps, and other items stored away from my last tank. I'll be using them where I feel comfortable. I want appropriately sized and newer equipment on the new display, so that older used equipment will probably go into the QT systems and water change system where it's a little less critical.
 

halmus

Registered Users
M.A.S.C Club Member
ex-officio
#93
FishTV;n639152 said:
Nice, that's what I call a fish room!

Thanks.


There are numerous reasons this is taking so long to really get going. My wife wanted the laundry room moved to the basement when we started this remodel project. The old laundry room off of the garage is now being converted into a mud room. I'm building wall-to-wall cherry cabinets and she wants that done before focusing on the basement. The two big cabinets on the opposing ends of the room are done and set in place. The discerning eye can pick out that the interior is birch and alder. I didn't want to waste cherry on the interior of the cabinets and I like the visual contrast. The bottom trays are for shoes. I have been looking for a reason to get a dovetail jig and play with it. So, those trays were my first attempt. I'm mostly happy with how they turned out, although I ran into some problems with the finish. I should have sealed the cherry before putting a stain on. It ended up soaking into the pores of the wood and looks a little splotchy. I've never liked finishing cabinets, just building them. I'll spend more time on the doors and that should turn out better.

I have some base cabinets to build upstairs and for the dry bar in the basement in an alcove near the aquarium. Once those are done, I can bring in a company to measure up and install counter tops for the dry bar and aquarium. I still need to make doors for everything but I want to do that all at once. It will be more efficient to do everything at once.


halmus

Registered Users
M.A.S.C Club Member
ex-officio
#94
Meanwhile, I'm stocking up on equipment. I picked up a big order from MRC yesterday at Aquatic Art. Orca II skimmer, kalk reactor, calcium reactor, and 2 x media reactors. Thanks Cris!

The skimmer is pretty huge. I haven't done much with the equipment other than unpackage the major items to inspect for potential damage in shipping. Everything is in great shape. MRC really protects their equipment for shipping.


I enclosed the tank stand inside and out with plywood. That gives me something to easily attach cabinetry to on the outside and made two long cabinet spaces under the tank for storage. I built heavy duty roll out trays on DIY guides to make storage more accessable. I will be able to store salt buckets and other dry goods down there. The trays and rollers are strong enough to lay in like a coffin and roll in and out (I tried it). The stand is tall enough I'll be able to store salt buckets down there and still have room for the overflow plumbing to be put in place.


For now, all of the equipment is being stored down there so it can't be damaged during the rest of the build.
 

halmus

Registered Users
M.A.S.C Club Member
ex-officio
#96
Thank you.

The cabinets upstairs will look really nice once the doors are on. For the basement, I'm having a hard time trying to get a company to take my money. I've contacted multiple companies asking for bids on hundreds of linear feet of cherry crown, base, and casing. Multiple cherry doors, including a french door. No one is getting back to me. Doesn't someone want my money? I don't want to order doors through Home Depot, but it might come down to that. I'll just need to source the rest of the material through another supplier I've already worked with for raw cherry.
 

TheRealChrisBrown

Reef Shark
M.A.S.C Club Member
ex-officio
#97
If that was your first attempt using a dovetail jig I'd say you did great! Looks fantastic. I like the pull out shelving on your stand, I can believe it can support that much weight. Strong work!
 

halmus

Registered Users
M.A.S.C Club Member
ex-officio
#99
TheRealChrisBrown;642992 said:
If that was your first attempt using a dovetail jig I'd say you did great! Looks fantastic. I like the pull out shelving on your stand, I can believe it can support that much weight. Strong work!
Legonch;642995 said:
Wow, nice craftsmanship there! Good job!
Thank you both.

Every day, when I'm too worn out from working at work and then working at home, I sit on a box in the aquarium room and plan this build out further in my head. I keep thinking how much I wish I was working full time on bringing all of this together.

Meanwhile, I still have some major purchases to make. I need return pumps, tank circulation pumps (vortechs), and lighting.

I am completely torn between LED and MH. My old tank was T-5 and MH. I want to believe LED can do the job. There's just something in the back of my head making me question the technology for SPS.

I am leaning towards Kessil or Radion Pro's. They will be supplemented with as much T-5 as I can possibly pack into the hood along side.

I had considered T-5 only because I've seen a tank with an identical footprint thrive with SPS running T-5 only. I would just expect the "flat" non-shimmering look.

Luckily, this build is going slowly. I have time to figure it out.
 
Top