DIY modular led with arduino controller

Metalsniper

Anthias
M.A.S.C Club Member
#1
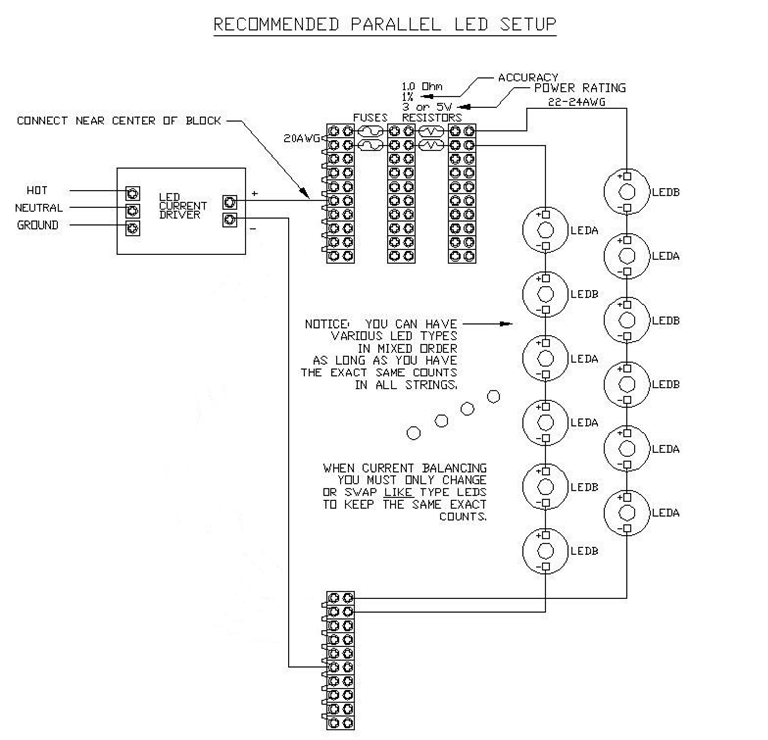
Okay, so I have been working this out in my head and I have decided to get this down in "ink". I am planning a modular 25 led system that will all run through one controller.

At this point I am considering both the DIM4 from ledgroupbuy and the typhon by boostled. The DIM4 has the advantage of having relay ports to act as a power supply for fans or to run relays that turn on or off the drivers when the dimming circuit is at 0; However, the typhon offers the flexibility of an arduino based system with the ability to program weather programs or such as I wish.

In order to begin I will be creating a mini test system with probably 10 leds. I am ordering two turquoise, two deep red, 6 true violet, 6 royal blue, 6 cool white and two neutral white for testing purposes.

It is my intention to have this system be contained in one housing with one cord and having all the dimming done within this contained system.
I have a problem in this respect; since I want to keep this trial system small what drivers should I use?
I already have two copper pc heatsinks that will be serving as my heatsink for this trial build but they are small, about 4"X3" and I will be connecting them with solid .25" aluminum. The spacing between them dictates how much space for drivers I have, but

I need to know what drivers to use. For the final build I will be using ELN-60-48 but I don't know if I should use these or buckpucks for such a small test run.

I want to get this purchase in tonight so any input is great, but make it snappy. ;)
 

Metalsniper

Anthias
M.A.S.C Club Member
#2
So I have a couple of photos of my proposed final product that I suppose I should put up too.


the plugs you can see are a locking ac power cord and an ethernet cord. the powercord is to transmit the 120V ac current to the meanwells, there are two on each module so that I can daisy chain the power from one to the next. The ethernet(cat5) is to transmit the dimming signal from the controller unit which will also daisy chain from one to the next.
 

cdrewferd

Reef Shark
M.A.S.C Club Member
#3
Following closely. Looking to do my LED's soon. Can't wait to see what you come up with.


Drew

Sent from my iPhone using Tapatalk
 

Metalsniper

Anthias
M.A.S.C Club Member
#4
at this point the design for the full modular is pretty set, it's more for the testing that I don't know what kind of drivers I should use.

The final setup should be something like 9 XT-E royal blues, 2 XPE blues, 4 XPG cool whites and 4 XPG neutral whites. Two XPE greens, one turquoise and one deep red.
 

KhensuRa

Dolphin
M.A.S.C Club Member
#5
WOW!!! That looks nice... So following...
 

Metalsniper

Anthias
M.A.S.C Club Member
#8
Alright, so for my trial run I just ate it and went with the buckblock 1000mA and 1400mA, So for my testing purposes I think I will run the whites and associated on the 1000mA and run two parallel circuits from the 1400mA with the assorted blues and other colors.

I'm seriously considering changing my final design(above) to use the buckblock instead for no reason other than the fact that they are so much smaller. The downside to this is that I would need either a high voltage or high current ac - dc converter in each module. This is potentially possible. I don't know yet, any input?
 

KhensuRa

Dolphin
M.A.S.C Club Member
#9
I am using bucks pucks now and have been on the fence on weather I want an extra one or if I just go with one meanwell.
 

Metalsniper

Anthias
M.A.S.C Club Member
#10
My problems are size and price; since I want everything to essentially be contained within the fixture itself I think I may need to go with the meanwell because I am having difficulty finding any ac - dc converters at the voltage and current that I need, and any that I do find are much larger than a meanwell is to start with.
 

Metalsniper

Anthias
M.A.S.C Club Member
#11
Okay, so I got most of my tester leds to see my color combinations and such but my drivers haven't arrived, and neither have my royal blues. :( Here are a few photos of the unboxing of what I did get as well as a "back of the evelope" idea for how I'm going to lay them out to start.


The cluster in the corners are blue, violet and missing royal blue, the cluster in the middle is turquoise, deep red and royal blue(still missing). The V is, from corner to corner, cool white, neutral white, cool white, neutral white and cool white.

Note: This is only for a first approximation of color temperature and mixing and I will most likely move them around. That is unless I am awesome and this works perfectly on the first try.

The demo unit will be built on two 3x4 copper pc heatsinks bridged by a 4x9 piece of 1/4 inch aluminum stock.
 

miwoodar

Tang
M.A.S.C Club Member
#12
Very cool - looking forward to the results!
 

amonchak

Administrator
Staff member
M.A.S.C Club Member
M.A.S.C. B.O.D.
M.A.S.C Treasurer
#14
Where did you order your stuff from??


Looks good so far.
 

Metalsniper

Anthias
M.A.S.C Club Member
#15
I've got stuff from groupledbuy.com, LEDsupply.com, amazon.com and fastener-express.com. I got the leds and two 20k dimmer pots from groupledbuy, two buckpucks from ledsupply, odds and ends from amazon(nothing yet actually but probably a soldering station at least), and some high temperature nylon screws coming from fastener express.

On a happy note I got my drivers tonight from ledsupply and got them all wired up to molex connectors for connecting to the led strands and dimming strands and a 4 set terminal block to handle the power supply wires with a jumper wire connecting the two respective strands. I have a couple of photos but, alas, no means to upload them tonight so I will get them up tomorrow probably.

Also, the always wonderful Erika is bringing me a drill press tomorrow so if I can get the local machine shop to cut my aluminum to size I will be able to start drilling and tapping.

It seems that all I am missing now is a soldering iron so I can start actually connecting these leds.
On that note, does it seem possible to split my power supply inlet into thirds, one for each driver and one that passes through a dimming pot to reduce it to 10V then split again to run the dimming circuits for each driver?

I need advice too as to where I need to put fuses and resisters so I can protect my leds and to measure my current.
 

miwoodar

Tang
M.A.S.C Club Member
#16
This was developed by kcress in the DIY LEDs thread on RC. I wish I had taken a direct picture of my fuse box before I put the top on.

I can't say for sure that I understand the question regarding dimming pots. I've seen some set ups that tried running a collection of pots all tied together that didn't end up in success. My pot setup is different than many of the more common threads because I used HLGs (didn't need a power source to the pots).


Edit to add...found this on my c:drive. This isn't mine but it's how a parallel system might look. I trimmed down the extra wire on my resistors and fuses...all of this can fit in a much smaller box.


Metalsniper

Anthias
M.A.S.C Club Member
#17
Okay, I figured out what I wanted to do would not end well, but as I'm using buckblocks for this trial I don't even need to worry about it yet.
The problem with what I was thinking is having two pots coming off of one to cut the voltage to 10V then dim from there is the pots become tied together with the dimming pots reducing the current for the voltage pot causing fluctuations in the actual voltage being supplied.
As it is I don't need to worry about supplying power to my dimming circuits I don't think because I'm using the buckblocks.
 

KhensuRa

Dolphin
M.A.S.C Club Member
#18
Im excited to see how the turquoise leds look.
 

dv3

Beluga
M.A.S.C Club Member
#19
KhensuRa;136331 said:
Im excited to see how the turquoise leds look.
+1 ..ill have the money for heat sinks and extra leds next week virgil if if you will be ready for an order
 

KhensuRa

Dolphin
M.A.S.C Club Member
#20
Yeah let me know I want four turquoise maybe six..
 
Top